Communicavi - Automated Text Response System
The Automated Text Response System (“Communicavi”) can be used to automatically send text messages, with photos and other attachments, in response to a variety of triggers, including time on a clock, GPS coordinates, snapping a photo, and pressing a single key on a keypad.
See what Communicavi can do for you. Download the Communicavi App today.
Step-by-Step Directions for Using Automated Text Response System (“Communicavi”)
These step-by-step directions for using Communicavi are divided into the following sections:
- Downloading the app
- Signing up to use the app
- Logging in to the app
- Opting in to messages sent via the app
- Creating groups
- Setting up Auto Msgs
- Setting up Msg Now
- Using Msg Now
- Setting up Pic Send
- Using Pic Send
- Offers
- Removing the app from your phone
Downloading the app
- Open the App Store on your iOS device and search for Communicavi
- Click GET to download the app onto your phone, entering your Apple ID password when prompted
- Once Communicavi has downloaded, click OPEN to open the app
Signing up to use the app
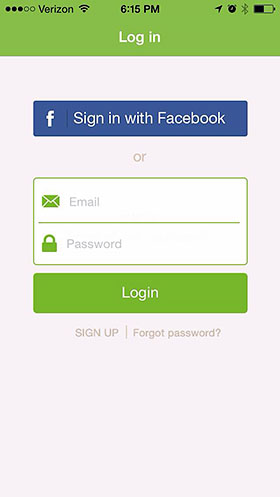
The first time you use Communicavi, you have the choice of signing up with your email address and mobile number or signing up with Facebook.
When signing up with an email address, information that needs to be entered is:
- First name
- Last Name
- Mobile Number
- Password (“Communicavi password”)
- Confirm Password (“Communicavi password”)
When signing up with Facebook, one needs to first log in to Facebook, then enter one’s mobile number.
Logging in to the app
To log in with your email address, you will need to enter your email address and Communicavi password.
To log in with Facebook, you simply need to log in or be already logged in to Facebook.
Opting in to messages sent via the app
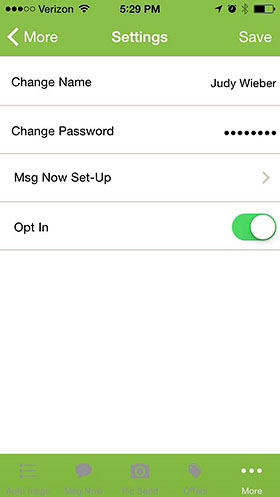
Under More| Settings | Opt In, slide the toggle switch to the right to enable opt in to messages sent by Communicavi.
To disable opt in, simply slide the toggle switch to the left.
Creating groups
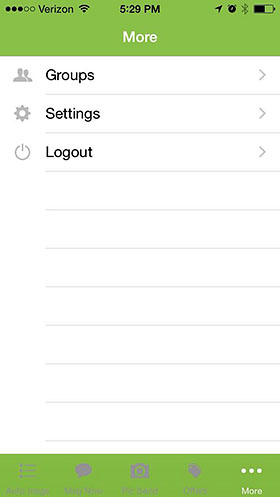
Click on More tab.
Then select Groups.
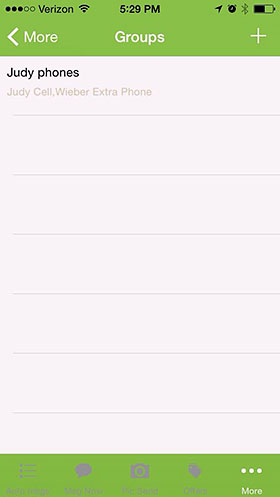
To create a new Group, click the + sign in the upper right-hand corner.

Type in a Group Name.
Select Members of the Group by tapping on names from your Contact list.
When finished selecting Members, click Save.
To edit an existing Group, click on More | Groups, then tap the name of the existing Group you’d like to edit. Edit the name of the Group or add/remove members by tapping the names from your Contact list to add or remove. When finished editing Group Members, click Done. When finished editing a Group, click Save.
Setting up Auto Msgs
(automated text messages triggered by time on a clock or GPS coordinates)
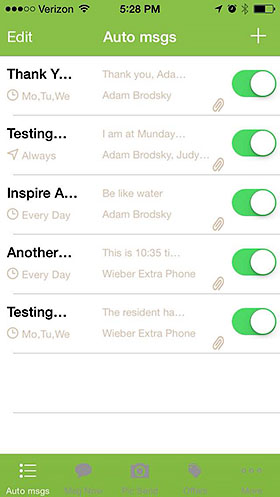
To set up a new Auto Msg, click on the Auto Msgs tab.
Then click the + sign in the upper right-hand corner.
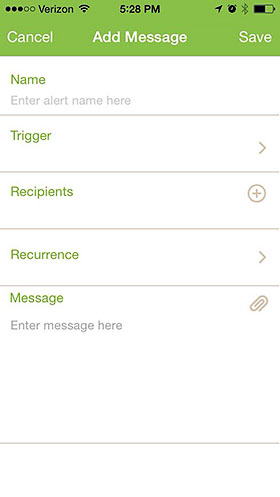
Enter a name for the Auto Msg
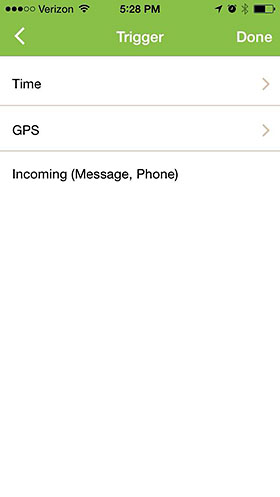
Select the Trigger: Time or GPS.
Note: The Incoming (Message, Phone) trigger is not available in the iOS version of Communicavi.
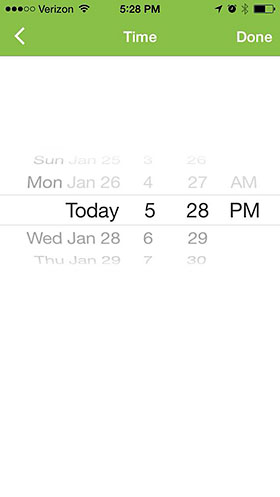
For a Time trigger, you will need to select a date and time that has not already passed. After selecting the date and time, click Done.
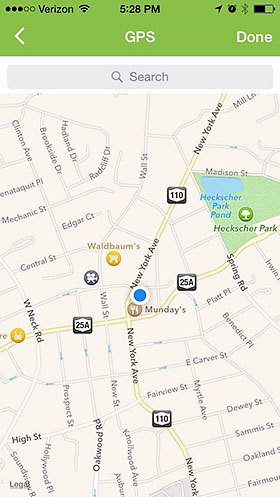
For a GPS trigger, you will need to select a location using the Google Maps widget. After selecting a location, click Done.
Select Recipients or Groups by tapping the desired names from your Contact list. After selecting Recipients or Groups, click Done.
For Time-triggered Auto Msgs, specify Recurrence. Choices are:
- No Recurrence
- Every Monday [after start date/time]
- Every Tuesday [after start date/time]
- Every Wednesday [after start date/time]
- Every Thursday [after start date/time]
- Every Friday [after start date/time]
- Every Saturday [after start date/time]
- Every Sunday [after start date/time]
- Every Day
After specifying Recurrence, click Done.
For GPS-triggered Auto Msgs, specify a Start Date/Time and an End Date/Time. Also specify Recurrence: Once (will send a message only the first time you reach the specified location) or Always (will send a message every time you reach the specified location) – within the specified Date/Time window. After selecting Start Date/Time, End Date/Time, and Recurrence, click Done.
Enter the desired text of the Auto Msg and attach a photo or other file. When finished typing the text and attaching files, click Save.
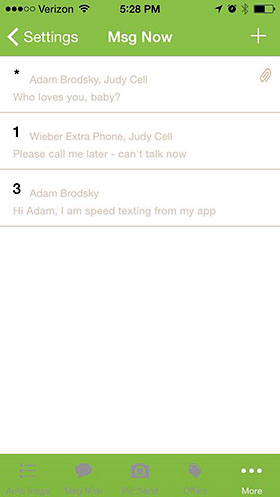
Setting up Msg Now
(“speed text,” sending of text messages via one-key touch)
To set up Msg Now/”Speed text” feature, click on More | Settings | Msg Now Set-Up.
To set up a new Msg Now/Speed text key, click the + sign in the upper right-hand corner.
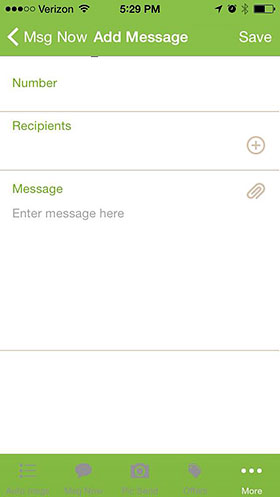
Select a number, 0-9, *, or #. Click Done.
Select Recipients or Groups by tapping the desired names in your contact list or selecting the desired groups. When finished selecting Recipients or Groups, click Done.
Enter desired text of Msg Now/Speed text message and attach photos or other files. When finished typing text and attaching files, click Save.
Using Msg Now
(“speed text,” sending of text messages via one-key touch)
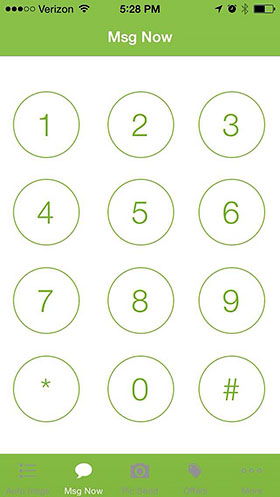
Click on Msg Now tab, and press the key corresponding to the Msg Now/Speed Text message you wish to send.
Setting up Pic Send
(automated sending of photos via text message)
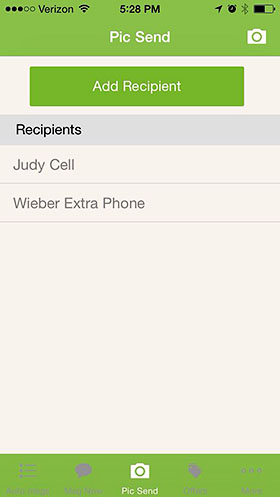
Click on the Pic Send tab.
Click on Add Recipient.
From your Contact list, select desired Recipient or Groups to whom you wish to send pictures. When finished selecting Recipients and Groups, click Done.
Using Pic Send
After selecting Recipients or Groups to whom you wish to send pictures, click the camera icon in the upper right-hand corner. This will open your camera. Take a photo as you would normally with your phone.
Select either Retake or Use Photo. When selecting Use Photo, the picture will be sent to the specified Recipients or Groups. A message will appear saying Image Sent Successfully.
Offers

The Offers tab contains clickable ads that may be used at local retailers for discounts on a variety of items/services. Each ad contains an In-Store Code that can be used to receive the advertised discount. Each ad includes an email box, which you may use to email the ad to yourself or someone else.
These offers are provided by Spotzot, which uses your location to serve up ads for retailers near your location.
Removing the app from your phone
To remove the Communicavi app from your phone, press and hold the Communicavi icon until a black x appears in the upper left-hand corner. Click on the x, and when asked if you want to delete “Communicavi,” click Delete (or Cancel, if you change your mind).